BEFORE YOU BUY! T SHIRT QUILT QUESTIONS TO ASK

Hello my friends, I know it’s been a while, but t’is truly the season. Meaning, this is THE season for quilters to be busy. June is second to the holiday season for reason of graduation gifts. But a far second, let me tell you.

I felt the need to take a moment to share a few thoughts, as I have recently found yet another “t shirt quilt maker” that offers a pretty sad result. This “company” brings customers in by way of a very low price. For those of you who want a t shirt (or memory, clothing, baby clothes, sports jersey, etc.) quilt made for you, here are some very important considerations I beg of you to ask prior to handing over your precious and irreplaceable items:

1. DO THEY USE A STABILIZER ON THE SHIRTS? Stabilizer is a light fabric that is ironed onto the backside of any jersey knit item to stop it from stretching. If you have shirts that are in good shape, or relatively new, this may seem like something that could be skipped. Not so, my friends.

When the shirts are sewn together, the stabilization prevents the shirts from stretching at the seam, so you don’t get your quilt back with all sorts of puckers at the seams. When the quilt is quilted, the stabilizer also adds an extra layer of strength and thickness to the top.

2. WHAT KIND OF BATTING WILL BE USED? Batting is the center, and batting price and quality varies more than cotton fabric. If they tell you they use 100% polyester, your quilt will not be as warm, but with all the t shirts you may be warm enough without a good quality batting. 80/20 batting is a blend, and cotton will quilt nicely, and lay flatter. Polyester batting also will not give the traditional look a quilt gets after washing, which happens with cotton batt as it shrinks in a little. If there is no batting, the end product is not actually a quilt and will not have a finished result (sort of like taking two pieces of paper and stapling the edges together and that’s it – the whole inside is left disconnected).

3. HOW MUCH QUILTING WILL BE DONE? Batting requires stitching or ties to hold it EVERY 4-6 square inches. So if your quilter says s/he will be quilting it every 12″, your batting will eventually tear and shift. Not good. Don’t pay someone to make your treasures into a quilt that will not last past a few washings.

4. WILL THERE BE ANY MATERIAL THE QUILTER PROVIDES? There are a few reasons to ask this question. One, if they are providing material for you, you will want to know the quality of the fabric (i.e. where did they buy it – a quilt shop or a craft store), the construction (is it 100% cotton), and whether it has been prewashed. Prewashing prevents additional shrinkage and especially with lower quality fabrics, the colors can bleed, which can essentially ruin your quilt. Secondly, you want to know that they are using good quality if that is what you are paying for. If the charge passed on to you per yard is <$10 you can bet it’s not fabric from a quilt shop, so you may have rougher texture, lower thread count, shredding seams or color bleed in the end.

5. HOW ARE THEY FINISHING YOUR QUILT? Finishing, meaning the binding (see photo below). This is a great example of an applied, double fold binding attached by machine to front and back, with mitered corners. If they are folding the back over to the front the finish may not be as clean, and same for knife edge finish.

I implore you to ask ask ASK for details from the maker PRIOR to relinquishing your shirts. It makes me very sad that there are great quilt makers out there potentially having their reputation tarnished by the few that are either ignorant or not focused on the quality and care of your special item.

These are truly one of a kind gifts and should be treated as such. I’ve made enough memory quilts to truly appreciate these irreplaceable gems and what they mean to the families that retain them.

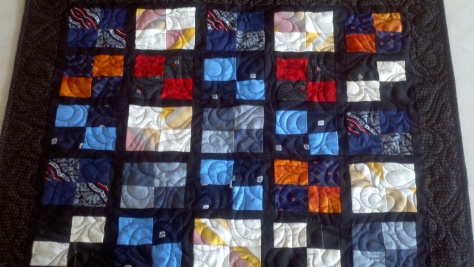
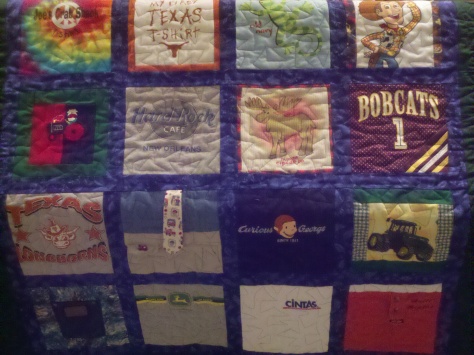
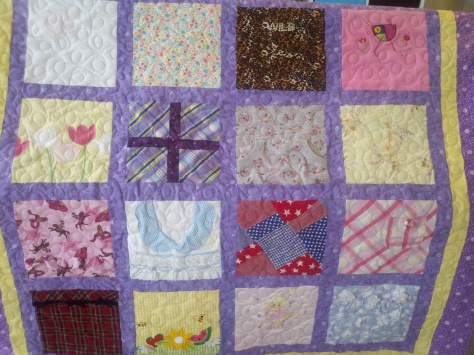
In fact, your best bet is to ask to see photos of their previous work. That will give you a good visual as to what you should expect from them. Just FYI, all the pix posted here are from quilts I have made for my customers. 🙂 The three below were for siblings:

Buyer beware, and best of luck with your endeavor my friends!!

turnaround time

I’m posting about this specifically because of a phone call I received today (12/4).

The caller had been referred from the local quilt shop (at which I work part time), because they knew I do a good job making t-shirt quilts. She asked if I could make some for her.

She needed six – five large lap size and one baby size. I told her I could cut her a deal for so many quilts and quoted her a price.

Because she hadn’t mentioned the timeframe, I asked if she wanted them by Christmas (remember the date above)…

She said, “That would be nice…”

Um, no.

Why not, you may ask?

Realistically, making that many t-shirt quilts would take me about 2 weeks without interspersing any other work. Just working on those. ONLY. And I work fast.

At present, I have 3 lap and a king sized t-shirt quilt to make start to finish prior to Christmas, as well as 5 quilts to quilt and 3 to bind in that same timeframe.

I have planned out my workload, and I know I can complete all these projects. I could even fit in a few more quilting jobs (no more t-shirt quilts though). Instead maybe I should just enjoy the time after I finish and work on charity projects.

So when people ask why it takes so long to get their job back from the quilter, here is why:

They have a backlog of work, in most every case. As an example, there was a day last month that I (literally) took in 10 jobs in one day. TEN. Those were not all easy all-over jobs. That included many custom jobs, very large quilts. So in one single day, my backlog grew by 3 weeks.

Three weeks? Yes. Three weeks because one quilt may have taken a day, but if I had an appointment here and there that caused me half days, that took away from my timeframe. And if a quilt was custom or potentially difficult, I would estimate it for 2-3 days, depending on the size.

Why so long? What happens if I under estimate the time it takes for my jobs to be completed????? How would you feel as my customer if I told you it would take 3 weeks and 5 weeks later you are sitting there wondering why I haven’t called you? What if you had a deadline like Christmas and I hadn’t called you?

So when you plan to have a quilter make something for you or even just quilt something for you (because you need to plan in the time afterwards to bind it), remember that they have work from other people in queue, and you will have to wait your turn. Some of us will pull you forward but charge you overtime or rush fee, but understand that the busiest times of the year are October – December and April – June.

I did a study on my business for the last 5 years. 42% of my income comes from the 4th quarter of the year on average. 21% comes from the three months prior to traditional graduation.

So if you are planning on a special t-shirt quilt for someone, try to plan ahead to ensure your quilter has plenty of time to get your gift back to you before your event.

Why does a quilt COST SO MUCH?

***WARNING*** This is a bit of a long read, but WELL worth it. For bottom line costs, see the bottom of the post. Thanks! 🙂

I field this question a lot, often worded differently. When people ask me the price for making them a quilt (mostly this comes with T-shirt quilt requests), they frequently reply with shock at the price tag. I get that when all they know about quilts is the crappy mass produced/imported quilts for sale at Cracker Barrel or Walmart for <$100.

At first that frustrated me, and then I started thinking they didn’t know the value of the purchase they wanted to make. I realized, it is really ignorance (I don’t mean that negatively) – these folks probably don’t frequent the local quilt shops and have no idea how much a yard of fabric costs, or what is entailed in making a quilt. It’s not part of their world. Just like I wouldn’t know anything about the cost of running a resort in Fiji.

So I am here to dish the details, but I’m going to try to keep it simple for easy understanding. REMEMBER: this is MY information in MY area of the country. I can tell you that just 4 hours south of me fabric costs $1 more PER YARD. I am positive that other areas of the country have a bit of variety in cost as well.

Let’s take a large lap sized T-shirt quilt as an example. Let’s say this quilt measures 60″x60″ (5′ square). Understand that with larger sizes, the cost goes up because the top is bigger, the back is bigger, the center is bigger, the edging is longer and the labor is definitely higher.

Here is the breakdown:

1. Fabric. Even with a T-shirt quilt, there is a lot of fabric to be purchased. Sold by the yard, you CAN find cheap fabric at Walmart or Joann’s or various other craft stores. But if you EVER have the chance, go in and FEEL those fabrics. They are CHEAP for a reason! Generally a looser weave, they feel scratchy and are not as densely woven, which will result in a less soft quilt, potentially more shrinkage and faster fading, and one that will fall apart or procure holes much more quickly.

For this size quilt, the yardage requirements are as follows: top for sashing 1 yard, top border 1 yard, backside of the quilt 4 yards, binding for the edge can probably be obtained from the extra backing after the piece has been quilted. Total yardage: 6 yards. I only buy fabric from the local quilt shop, so the fabric will cost anywhere from $8/yard (for solids and muslin) to $13. The most common price I pay for fabric is $11.29/yard. Total fabric cost: $67.74 (plus tax).

2. Stabilizer. This is REQUIRED for any T-shirt quilt to properly be made (in my opinion). True, not everyone uses it, but when people bring me T-shirt quilts to quilt for them, I insist. It just creates a mess when the shirts are not backed with stabilizer. They stretch when put together and end up forcing creases in the shirts when quilted. There are many brands and types, costing anywhere from $0.99/yard (only 17″ wide) to $6.99/yard. So let’s go with an average for simplicity sake: mostly I use the $2.99/yard 17″ wide medium weight stabilizer. The shirts will take probably 10 yards of stabilizer, so the total cost of stabilizer: $29.90.

3. Batting. This is what goes in the center of the quilt. With a lightweight batting (just like with a lightweight stabilizer) the batting will not add weight, but you can get a high-density batting if you want it heavy and thick. Different battings have different requirements for how far apart they can be tied or stitched, so if someone says they’re going to stitch around the outside of the shirts only, then your batting WILL fall apart – that’s not close enough in. Generally I use a cotton polyester blend for T-shirt quilts, which costs $8/yard. Needing about 2 yards for this project, total batting cost: $16.

4. Quilting. While this IS labor, I put it separately because some quilt makers send the quilts to someone else for this service, or tie the quilt (which technically makes it not a quilt, but a comfort). I perform it myself, but the rate is different than how I figure general labor. In this geographic area, we generally charge $0.02/square inch of the quilt top for an all over (aka edge to edge) design. Custom quilting brings a higher charge. So this quilt 60″x60″ = 3600 square inches. 3600 x $0.02 = $72. I also charge a $5 thread fee. Total for quilting: $77.

5. Labor. This is the real variable. While time = money, more importantly EXPERIENCE = MONEY. You will DEFINITELY get what you pay for. Much like fabric, the rates can vary depending on where you live. I am very efficient, and I charge $25/hour. Some people have asked why I charge so much “just to sew”. Well, while the words from my mouth were sweeter than in my head, the response was basically, if you don’t want to learn to do it yourself, don’t question what I charge for my expertise.  That being said, a quilt this size usually takes me 8-9 hours, but I charge 6 hours of labor for the assembly. Total labor: $150.

6. Binding. This, too, is labor, but again, a separate calculation. This is the edging around the quilt. For binding prep and attachment by machine both front and back I charge $0.30 per linear inch around the edge. You may find someone that charges less, but they may not have mitered junctions, or mitered corners. If you want the binding attached to the back by hand, expect to pay more. 60″ x 4 edges = 240 linear inches x $0.30 = total binding cost: $72.

All this being said, here is a few photos of what I produce, for comparison purposes. You can see the finished product is crisp and clean, very professional looking.

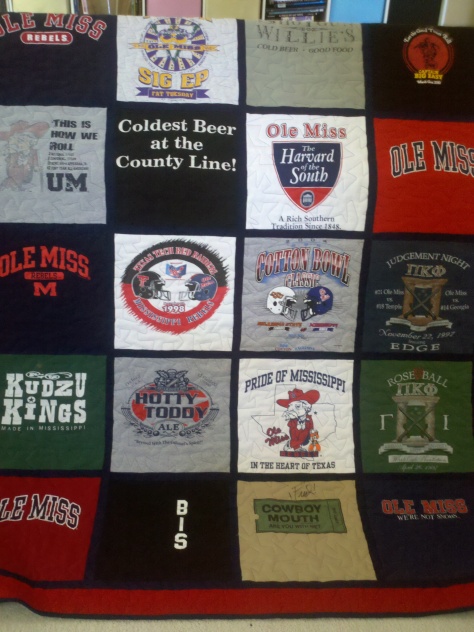
ole miss t shirt quilt

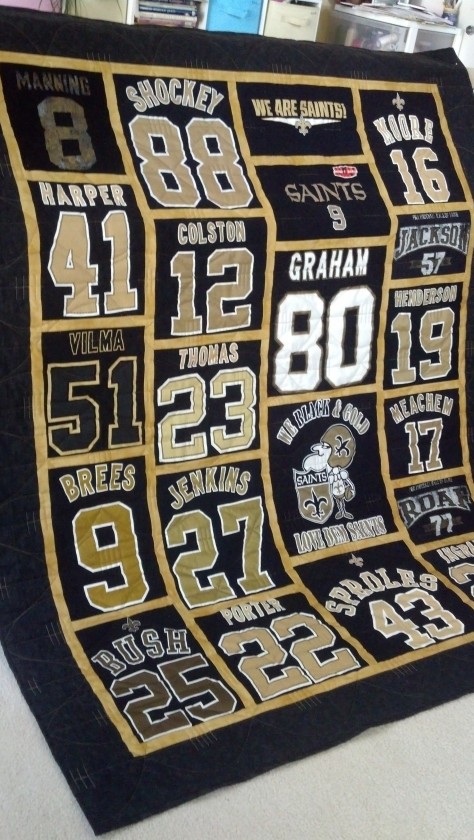
NO Saints SB Tshirt quilt

NO Saints SB Tshirt quilt

Tshirt quilt with precise instructions from the mom

Tshirt quilt with precise instructions from the mom

Assuming I haven’t forgotten anything, here’s the tally:

  • Fabric (est tax incl) $73
  • Stabilizer                   $30
  • Batting                       $16
  • Quilting                     $77
  • Labor                         $150
  • Binding                     $72
  • TOTAL                  $418 (before tax)

Amazed? You shouldn’t be. Honestly I am amazed when some people charge such low fees for their work. I gather they either value their time differently or are using REALLY cheap fabric. Bottom line: THIS IS THE COST. IF SOMEONE TELLS YOU THEY CAN DO IT FOR LESS, UNDERSTAND THAT THE DIFFERENCE WILL COME FROM ONE OF THESE AREAS. And to ensure you are protecting yourself, see my blog about questions to ask prior to buying a T-shirt quilt.


T-shirt quilts – the nitty gritty

NO Saints SB Tshirt quilt

NO Saints SB Tshirt quilt, quilted with footballs

I guess the reason I feel the need to cover this topic over and again is because well, it’s important. People collect t-shirts from concerts/places/life events/football teams that are important to them. T-shirts cost money, AND usually represent great memories, accomplishments or something important to the owner. Well, quilts ALSO cost money, and if they cost a lot, they are very likely made with care and love, integrity and professionalism. So in essence I feel like by me (an expert on this topic) informing you (the reader) about details to consider, I am helping you to protect your investment.

OK, before I get to the meat of the topic, I just have one more thing to say: IF YOU ARE TRYING TO MAKE A TSHIRT QUILT FROM PINTEREST, STOP NOW!!! I’m sorry if that sounds rude, and I’m not trying to be mean; I’m just trying to save you from spending exponentially more money when you have to take your work-in-progress to someone who knows what they’re doing to fix it for you. And I say this from being that person that fixed some pretty difficult works-in-progress.

Well, one more thing: you pay for what you get. I don’t see the website up anymore, but there was a local person a few years ago charging $75 for t-shirt quilts, and they were HORRENDOUS. Not only were they ugly and poorly constructed, but the ‘quilting’ was so sparse that the batting would have begun to fall apart within a few washes.

OK here we go:

1. INSIST on seeing examples of their work. Here’s what to look for:

  • Does the quilt maker have one style? If so, that is exactly how you can expect yours to turn out. Inquire if they have more options to offer.
  • Are the panels of the t-shirts cut so that some of the words/picture is missing? Is that what YOU want?
  • Can you see the quilting stitches? If not, can you see lines that look wavy (like when a curtain drapes)? That could indicate the stitching is not frequent enough to support the batting. Stitching/ties should be every 4-6″ square with standard (poly, cotton or blend) batting.
  • How do the quilts look? Is the maker’s style elegant, country chic or throw it all in the pot and stir? Elaborate quilts can be made from t-shirts, but usually a more extensive pattern will call for a higher cost. So if that’s what you want, discuss it with the quilt maker.
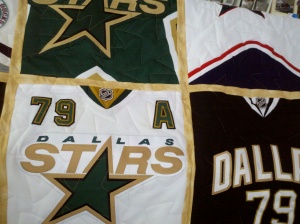
  • If you have sports jerseys, has this quilt maker worked with them before? I can say they are generally more difficult due to the weight, slickness of fabric and stickiness of the logo, and experience is very helpful. Same goes for silk shirts, neckties and crown bags.

If they have examples on hand to show you, that’s even better.

2. Ask them what kind of stabilizer they use. I use that phrase because using stabilizer is NOT an option, it is required. I tell you this as a t-shirt quilt maker AND as a long arm quilter. When it comes time to quilt the layers of your project together, if the shirts are not stabilized, they will stretch and pull, and you will end up with puckers and wrinkles in your quilt or a quilt that is not squared up, and that just does not look good.

I’ve had a regular customer ask me about this, because she was making one and didn’t want it to be so heavy. There are very lightweight stabilizers that can keep the weight down, and a lighter weight batting can be used as well, if that is a concern.

3. Ask them WHERE they purchase their fabric. YES there is a difference in quality. If they give the name of a local quilt shop or start rambling on about this great online store they found, you’re probably safe. Joann’s even has ok fabric. But if they buy at Walmart, Hobby Lobby, Hancock’s or even Michaels, then ask to see some samples of fabric they would use in your quilt. If it’s rough, that means it is not as tight of a weave, which means it may shrink more or unevenly, the dye may fade quicker, and that fabric will likely have holes in it in fewer washes.

4. Ask about their process. How do they go from t-shirt to quilt? How do they decide what shirts go where (this question can ensure all your red shirts do not end up in one column)? Do they quilt it on their regular sewing machine, on a long arm machine or do they have someone else quilt it for them for you (could increase the cost)?

On this note, different quilt makers have different pricing strategies and go-to styles. I charge by the size and generally (unless otherwise requested) cut the panels to different sizes to fit in as many as possible, with sashing and a border. One of my esteemed fellow quilt makers charges by the shirt ($28 per), and she uses 2″ squares in various colors to essentially border the shirts or provide spacing, and then a border. It’s ok to call around and ask about these things – you might find the perfect match to your style by doing a little extra research!

memory quilt with tshirt panels
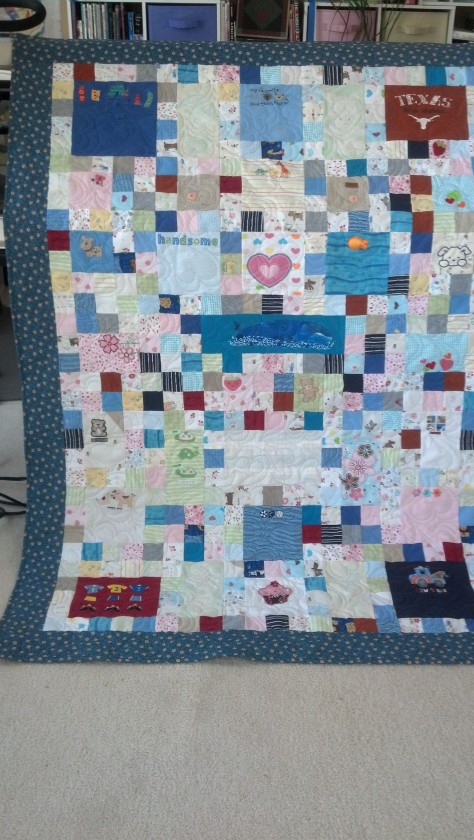
memory quilt with tshirt panels

Baby clothing quilt with panels and 2" squares

Baby clothing quilt with panels and 2″ squares

5. Ask how they finish the quilt. Borders make a great frame for quilts. It also allows for the edge of the front to tie in color-wise to the back of the quilt. And it provides a no-stretch surface for the quilt maker to bind the top and back together.

  • If they do a knife edge finish, that means they put the whole thing together, sew three edge sides together, flip it right side out, sew the last side and then quilt or tie it. This can lead to batting getting loose inside the quilt (by not getting sewn into the edges) and less than exemplary quilting.
  • If they fold the binding over from front to back or back to front, that will secure the edge but ask to see examples of their work, because this can ALSO lead to a very uneven look and really fat binding.
  • If they use a double fold applied binding (also called French fold), you will have a very tight, clean edge to your quilt. Especially if they know how to miter their corners.
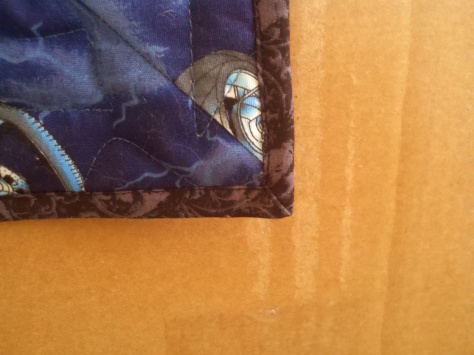
a beautifully mitered corner

You should expect to spend between $400-1200 on your quilt, depending on a variety of factors, including number of shirts and desired quilt size. Understand, your quilt maker may be supporting their family and this is their source of income. Their labor is their time and it will cost you. Batting and fabric costs add up as well. I have spent $120 just for the backing fabric on one quilt (the one below)!

king size crown bag quilt

king size crown bag quilt

Because you should expect to pay that kind of dollar, you should also expect a result that is on par with that price. But, YOU have a responsibility here too:

1. Ask questions. I have outlined a few above that I don’t think the average non-quilt maker would know to ask. If there is something else you are unsure of, ASK. It’s not a dumb question, it’s smart for you to become educated about your expenditures in advance.

2. Tell him/her what you want! The scariest quilt I have made in recent times happened to be the last one, and what made it so scary is that she told me to just do whatever. As a long arm quilter I LOVE that, but as a quilt maker, I cannot predict what colors she does or doesn’t like, so I just went with what I thought she might like. Fortunately for me, she loved it. I did too, but it could have been a disaster if she didn’t like yellow. Or purple (the back was tie dyed white/purple)!
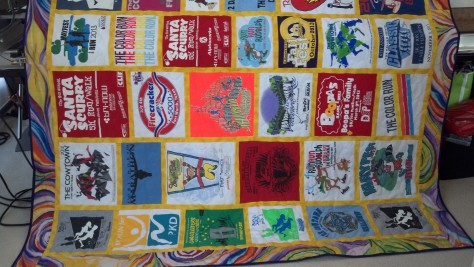
tshirt quilt

tshirt quilt

3. They should ask you questions during the initial discussion, like how big you want it to end up (is it for a bed or not), who is it for (male or female, young or older person?), do you want all the shirt blocks to be the same size, specific colors you do or do not want in the quilt, any special deadline or shirt that should be centered…

This quilt was made for a graduating son, and the mother was very particular and involved in the entire process. But I got three hugs at the end, so I think she was pretty happy with the result.
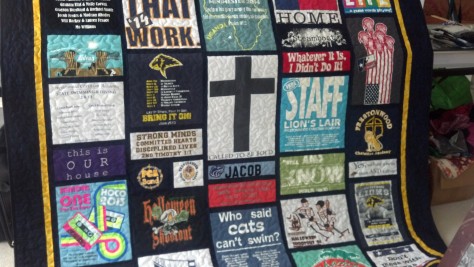
Tshirt quilt with precise instructions from the mom

Tshirt quilt with precise instructions from the mom

Usually people tell me if it is a memory quilt, which is a great tidbit, because I mostly quilt those in all-over hearts and try to keep the color scheme upbeat. This was a memory quilt with not much to use (sudden loss). Included were t-shirts, a sweatshirt, PJ pants and a watchcap. If your quilter has experience, she’ll make anything work for you :).

memory quilt

This was a memory quilt for a baby lost pre-term. The birthing coach had me make it from onesie’s from the other babies she had birthed.
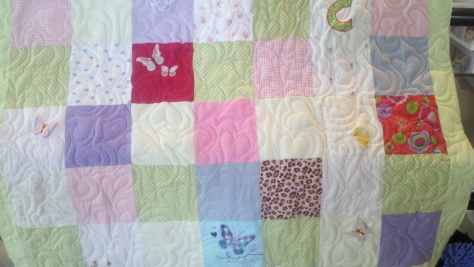
memory quilt from onesies, patchwork style

memory quilt from onesies, patchwork style

4. As a quilter and quilt maker, I can tell you that I try to do everything to my best ability. But I’m not the one paying for the quilt and I’m not the one that’s taking it home. You are, so make sure YOU know what you are getting for your money.

If you are unsure, reach out. You can also Google ‘tshirt quilt photos’ and find more than enough fodder to peak your imagination. Best of luck!
T-shirt quilts (yes, again)

NO Saints SB Tshirt quilt

NO Saints SB Tshirt quilt, quilted with footballs

I guess the reason I feel the need to cover this topic over and again is because well, it’s important. People collect t-shirts from concerts/places/life events/football teams that are important to them. T-shirts cost money, AND usually represent great memories, accomplishments or something important to the owner. Well, quilts ALSO cost money. So in essence I feel like by me (an expert on this topic) informing you (the reader) about details to consider, I am helping you to protect your investment.

OK, before I get to the meat of the topic, I just have one more thing to say: IF YOU ARE TRYING TO MAKE A TSHIRT QUILT FROM PINTEREST, STOP NOW!!! Not trying to be mean; trying to save you from spending exponentially more when you have to take your work-in-progress to someone who knows what they’re doing to fix it for you. And I say this from being that person that fixed some works-in-progress.

Well, one more thing: you pay for what you get. I don’t see the website up anymore, but there was a local person a few years ago charging $75 for t-shirt quilts, and they were HORRENDOUS. Not only were they ugly and poorly constructed, but the ‘quilting’ was so sparse that the batting would have begun to fall apart within a few washes.

OK here we go:

1. INSIST on seeing examples of their work. Here’s what to look for:

  • Does the quilt maker have one style? If so, that is exactly how you can expect yours to turn out. Inquire if they have more options to offer.
  • Are the panels of the t-shirts cut so that some of the words/picture is missing? Is that what YOU want?
  • Can you see the quilting stitches? If not, can you see lines that look wavy (like when a curtain drapes)? That could indicate the stitching is not frequent enough to support the batting. Stitching/ties should be every 4-6″ square with standard (poly, cotton or blend) batting.
  • How do the quilts look? Is the maker’s style elegant, country chic or throw it all in the pot and stir? Elaborate quilts can be made from t-shirts, but usually a more extensive pattern will call for a higher cost. So if that’s what you want, discuss it with the quilt maker.
  • If you have sports jerseys, has this quilt maker worked with them before? I can say they are a big pain, and experience is very helpful. Same goes for silk shirts, neckties and crown bags.

If they have examples on hand to show you, that’s even better.

2. Ask them what kind of stabilizer they use. I use that phrase because using stabilizer is NOT an option, it is required. I tell you this as a t-shirt quilt maker AND as a long arm quilter. When it comes time to quilt the layers of your project together, if the shirts are not stabilized, they will stretch and pull, and you will end up with puckers and wrinkles in your quilt or a quilt that is not squared up, and that just does not look good.

I’ve had a regular customer ask me about this, because she was making one and didn’t want it to be so heavy. There are very lightweight stabilizers that can keep the weight down, and a lighter weight batting can be used as well, if that is a concern.

3. Ask them WHERE they purchase their fabric. YES there is a difference in quality. If they give the name of a local quilt shop or start rambling on about this great online store they found, you’re safe. Joann’s even has ok fabric. But if they buy at Walmart, Hobby Lobby, Hancock’s or even Michaels, then ask to see some samples of fabric they would use in your quilt. If it’s rough, that means it is not as tight of a weave, which means it may shrink more, the dye may fade quicker, and that fabric will likely have holes in it in fewer washes.

4. Ask about their process. How do they go from t-shirt to quilt? How do they decide what shirts go where (this question can ensure all your red shirts do not end up in one column)? Do they quilt it on their regular sewing machine, on a long arm machine or do they have someone else quilt it for them for you (could increase the cost)?

5. Ask how they finish the quilt. Borders make a great frame for quilts. It also allows for the edge of the front to tie in color-wise to the back of the quilt. And it provides a no-stretch surface for the quilt maker to bind the top and back together.

  • If they do a knife edge finish, that means they put the whole thing together, sew three edge sides together, flip it right side out, sew the last side and then quilt or tie it. This can lead to batting getting loose inside the quilt (by not getting sewn into the edges) and sloppy quilting.
  • If they fold the binding over from front to back or back to front, that will secure the edge but ask to see examples of their work, because this can ALSO lead to a very uneven look and really fat binding.
  • If they use a double fold applied binding (also called French fold), you will have a very tight, clean edge to your quilt. Especially if they know how to miter their corners.

a beautifully mitered corner

You should expect to spend between $400-1200 on your quilt, depending on a variety of factors, including number of shirts and desired quilt size. Understand, your quilt maker may be supporting their family and this is their source of income. Their labor is their time and it will cost you. Batting and fabric costs add up as well. I have spent $120 just for the backing fabric on one quilt (the one below)!

king size crown bag quilt

king size crown bag quilt

Because you should expect to pay that kind of dollar, you should also expect a result that is on par with that price. But, YOU have a responsibility here too:

1. Ask questions. I have outlined a few above that I don’t think the average non-quilt maker would know to ask. If there is something else you are unsure of, ASK. It’s not a dumb question, it’s smart for you to become educated about your expenditures in advance.

2. Tell him/her what you want! The scariest quilt I have made in recent times happened to be the last one, and what made it so scary is that she told me to just do whatever. As a long arm quilter I LOVE that, but as a quilt maker, I cannot predict what colors she does or doesn’t like, so I just went with what I thought she might like. Fortunately for me, she loved it. I did too, but it could have been a disaster if she didn’t like yellow. Or purple (the back was tie dyed white/purple)!

tshirt quilt

tshirt quilt

3. They should ask you questions during the initial discussion, like how big you want it to end up (is it for a bed or not), who is it for, do you want all the shirt blocks to be the same size, specific colors you do or do not want in the quilt, any special deadline or shirt that should be centered…  Usually people tell me if it is a memory quilt, which is a great tidbit, because I mostly quilt those in all-over hearts and try to keep the color scheme upbeat. This was a memory quilt with not much to use (sudden loss). Included were t-shirts, a sweatshirt, PJ pants and a watchcap. If your quilter has experience, she’ll make anything work for you :).

memory quilt

This was a memory quilt for a baby lost pre-term. The birthing coach had me make it from onesie’s from the other babies she had birthed.

memory quilt from onesies, patchwork style

memory quilt from onesies, patchwork style

4. As a quilter and quilt maker, I can tell you that I try to do everything to my best ability. But I’m not the one paying for the quilt and I’m not the one that’s taking it home. You are, so make sure YOU know what you are getting for your money.

If you are unsure, reach out. You can also Google ‘tshirt quilt photos’ and find more than enough fodder to peak your imagination. Best of luck!
Making a Tshirt Quilt – some good things to know

So, now that I’ve been doing this for a while… I thought I should add a few important items to the list of ‘what one should consider’ when making, or buying, a t-shirt quilt.

A. Let’s talk about stabilizers. Some people say they don’t want to use it, maybe because it adds too much weight to the quilt, or because they don’t think they need it. ***The quality/thickness of the tshirt has NOTHING to do with the use of stabilizer. Yes it should DEFINITELY be used on thinner shrits, but thicker tshirts still stretch, because they are still double jersey knit. Some people swear by stabilizer, insisting that you must use a certain type – maybe the $4/yd stuff that is basically fabric that irons on to the backside of the shirts. Sometimes I use heavy weight, sometimes I use medium/light weight. But I ALWAYS use something.

Use what you want to use, but please PLEASE PLEASE use SOMETHING! You may be able to get the squares together somehow without using any stabilizer, but even if you do, you are setting up the quilter for a disaster. Which means you are setting yourself up for a disastrous result.

The hopping foot on the longarm quilting machine essentially pushes the fabric in front of it. With regular cotton fabric, this ensures a nice, smooth stitch. With double jersey knit without a stabilizer, the fabric is free to stretch, and will get pushed and stretched in front of that hopping foot. This WILL create puckers and folds. The stabilizer prevents that by holding the fabric in place. Even the stuff that’s only $1/yd.

B. Use sashing. Sashing provides a great boundary between blocks, and creates a very clean look. It also helps ensure the seams between shirts don’t end up acting like big curbs for the quilter to get through.

There are as many ways to make a tshirt quilt as there are colors under the sun; maybe instead of sashing you use 2″ blocks. Or a different frame/border for each panel. If you use good quality fabric between the shirts, you will have a MUCH better looking quilt than if you sew a bunch of tshirt panels together.

C. VERY IMPORTANT! Use an experienced quilter. Very often, once a tshirt has been quilted through, it cannot be unquilted. I.e., if the stitches are pulled out for any reason, the holes in the shirt panel will remain, and will not close up with washing. There are two types of needles, and most of us don’t even keep the blunt point in stock, so if there is a hole in your quilt made by that longarm needle that doesn’t have thread through it, then it is a new hole punched in your quilt, and it could open up with washing.

If mistakes are made during quilting, an experienced quilter will know how to locate the stitches (they really sink into the jersey knit and are hard to remove once quilted) and pick them out without tearing the shirt fibers, as well as retracing steps to ensure there aren’t holes poked through the panels left open to see.

I will also say that quilt makers will charge based off different things – some charge based on size, some on panels (number of shirts). If you want to have a tshirt quilt made for you, ASK FOR PHOTOS, REFERENCES, or other information that will give you a warm, fuzzy feeling that this person is understanding the level of quality you want to end up with. Ensure you KNOW that they are experienced enough to complete the project.

I have seen horrible projects come out of good intentions. If you are unsure of the process, the price determination, how the outcome will look, ASK. Please!!! SHOP AROUND! There are MANY talented tshirt quilt makers out there, just ensure you are enlisting one that will provide the results YOU want. It’s YOUR money, YOUR shirts, YOUR project – ensure you are going to get what YOU want. If not, say thank you and call someone else.

Understand as well, the cost is usually equitable to the quality. If you are paying $75-150, you are probably getting something that isn’t going to last too long, or look very clean. And I can tell you, there are a lot of amazing tshirt quilts out there, but they won’t all look like this:

kids clothes

memory quilt

tshirt quilt

memory quilt


memory quilts – a very important job

I had a friend ask me once, whether I thought the popularity of t shirt quilts had increased due to the Twilight movie. I honestly had no idea, because I didn’t pay attention to the timing of the movie and that aspect of my business. I have recently noticed the increase of memory quilts I make as a percentage of quilts total.

That could be partly due to the fact that many of the memory quilts I make are requested for multiple family members from the clothing of one person. Last Christmas I made 6 quilts from a man’s blue business shirts for his widow and sons. I helped a friend make another 5, and am currently working on a set of 5, in the same fashion.

I have made a small wall hanging out of grandpa’s ties, a small patchwork quilt for the mother of a still born baby and a quilt for mom to remember her son by. Oftentimes, the quilts are made as gifts, with the receiver unsuspecting.

When I meet with someone to determine what the project will finish up to be, they often ask if I need a deposit. With t shirt quilts and memory quilts alike, I require nothing other than those special items they are giving me to work with. They are irreplacable, and when they belonged to some one that has passed on, each item truly has a special significance.

Usually when I’m working on these types of projects, I feel a connection to the person. I mean, literally I am handling some of their favorite clothing. The person giving me their items usually tells me a little something, as do the clothes. The smell of smoke, some dog hair, or the Italian silk fabric all tell a little bit of the story about the former owner. What tells the most is the fact that someone loved that person so much that they want to have their items turned into an item that can be loved and cuddled with for a very long time after.

Today I cried. I guess that’s the proof that I get emotionally involved in my work. I’m making quilts for family including a young girl, about 7 years old. Her daddy died from a medical condition, he was 47. He also left behind 2 other children and his loving wife. When he painted, he wiped his slop on his jeans. He used to take his wife dancing, and must have had some of that Air Force still in him because those jeans were starched to the hilt!

Every quilter that I know wants to please their customer. For me, the joy I hear in my clients voice is of greater importance than the check I receive (except that I do have bills to pay…). But when it comes to these quilts, I know they have a very special meaning for the receipient.

Below are some photos of memory quilts I have put together or finished for clients. Like t shirt quilts, they aren’t and shouldn’t necessarily be large square blocks thrown together, unless that is what the customer specifically requests!

How to make a T SHIRT quilt

I am going to do my best to keep this simple. What this post will lead you to is a finished quilt top, with stabilized t-shirts, separated by sashing and surrounded by a border. I can’t tell you how much material you will need because I don’t know what size you want to end up with, but you can count on 1-2 yards of sashing material and border material (each).

Required items:

  • t-shirts
  • stabilizer (I like to use Pellon heavyweight fusible, available at nearly any craft/sewing shop) – you’ll need a yard for approximately every 2 shirts (unless your squares are going to be small)
  • sashing material
  • border material
  • hot iron, set to ‘cotton’
  • sewing machine and thread
  • rotary cutter and self-healing cutting mat (also available at sewing/craft stores)

The process is as follows:

1. Cut the shirts! The main point of step 1 is only to separate the front from the back and take the sleeves off.

2. Decide which panels from the front and backs of your shirts you would like to include in your quilt, discard the rest. Count your panels so you can ensure the number works, ie if you have 28 panels and want to make the quilt 4 x 6, you need to cut out a few more, or make your quilt 4 panels across by 7 long. Or you could find another shirt and make it 5 across by 6 long (30 total). If you have two panels that are small logos, they can be sewn together into one block.

3. MEASURE!!! This step will help you determine the size of your quilt, because it is based mainly on the size of the panels. Check the smallest and largest size your squares could possibly be based on how they are currently cut (approximately, they aren’t square yet) AND the logo/picture on the panel. If the smallest panel you have cut is 10″ x 10″, then your squares will be maximum that size. If the largest logo you have is 8″ wide x 4″ tall, then your smallest possible square would be about 9″ wide x 5″ tall.

4. TRIM the panels to about 1″ wider and longer than you want them to end up.

5. Stabilize your t-shirts. To be perfectly honest, the part of my job I like the least is ironing, but this is really REALLY a necessary step. On your ironing board, place your first panel face down. Put stabilizer on top of it, bumpy side down and press.

If you move the iron back and forth you may incline the shirt to stretch, so just press, and pick your iron up and press again until you’ve covered the entire shirt.

Your stabilizer should come to the edges of the shirts, or at least close.

6. TRIM, yes again. Notice how the stabilizer made your shirts less stretchy? Since we now have STABLE squares/rectangles, we can trim them to the size we want them to be (making sure we include 1/4″ seam allowance on each side, of course).

If you want your quilt to be nice and flat, ensure those squares are all the same size.

7. Add sashing. This is a fun part for me, because it’s really starting to come together. First you need to decide how big you want the sashing to be, and that may be based on how large you desire the final product to be. Let’s assume you want the sashing to end up 2″ wide, so you cut 2.5″ strips out of the material you want.  Stack your shirts all facing the same way (ie face down, top of shirt away from you). Lay a shirt on top of the sashing strip, and sew. When that shirt is attached, place another shirt on your strip. Then basically chain piece until your sashing isn’t long enough to fit another shirt. Get another sashing strip and begin again. I can usually get 3-4 tshirts along each sashing strip.

8. IRON, yes again. uuuuuuuggggghhhhhhhhh. Iron the seam towards the sashing, which it will be inclined to go towards anyway.

9. More sashing… Lay the shirts all the same way again, say face down, top towards your left side. Lay your shirts one at a time on the sashing and sew, just as before.

10. hmmm, IRON? Y E P!!! Again.

11. Lay out all your panels in a large area (like the floor or a big table). This is where you can decide what your eye likes, and which squares you want where based on color or logo.

12. Assemble rows! If you need to, pick up two squares at a time from your layout, so as not to confuse yourself. If you can pick up a row at a time then do so. When you complete each row, there will be one side without a sash. Add the sash at that time. You can also use this as an opportunity to attach sashing to the bottom (or top, whichever is missing sashing). Doing that at this point alleviates the need to sew a long seam.

13. Sew rows together to complete the center! This step is as easy as it sounds!

14. Border time!! Decide how big you want your border to be to frame your great work of art, and cut it 1/2″ larger. PIN THE BORDER TO BOTH SIDES OF YOUR QUILT! Measure your top so far through the center and that’s as long as your borders should be for the sides. Be wary of WAVY borders if you don’t measure and/or pin!!! Once the sides are attached, then measure/pin the top and bottom borders and attach.

YOU ARE DONE!!! Can you believe it? There are plenty of ways to make it more complicated and intricate, but this is a good starting point!

Best of luck my friends, and happy quilting!!!

Button Down Shirt Quilt?

What’s that? Like a t-shirt quilt, only with button down shirts? YES!! That’s exactly what it is!

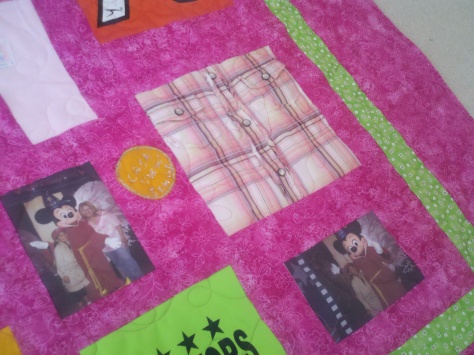
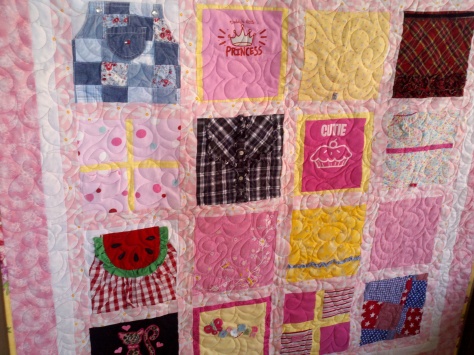
This one happened to be within a ‘baby clothes quilt’, but the entire quilt can be made up of them.

button down shirt in a quilt
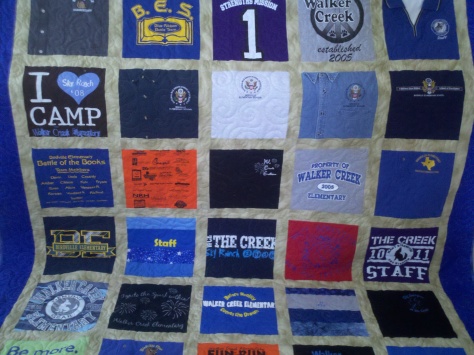
principal’s quilt

This one was for a school principal that was retiring. The top left shirt, second row 2nd and 4th shirts were button downs. The middle second row was a sweatshirt, the top row right has an open collar.

These types of shirts are challenging to add to a quilt, but they can either be mixed in with other shirts, or an entire quilt can be made of button down shirts alone!

What do you need to do to use those shirts? Well, trim them, just as if they were a t-shirt. They need stabilizer, but only along the opening, where the buttons and holes are, so that area doesn’t stretch apart. If you want to cut off the collar (or can based on your square size), then you don’t have to deal with it. If you have a button down collar or something cute that you want to keep, then fold the collar up, sew some plain muslin into the V / empty area of the neck, and that covers the empty space.

The difficulty can come with sewing through the many/thick layers of material those types of shirts involve. You need to be very careful with measurements, seams and allowances and guiding your machine and needle through the thick areas of the shirt.

I’ll post soon on the hockey jersey quilt I just finished. THAT was difficult! Happy quilting!!

T Shirt Quilt

tshirt quilt


There was no other title for this post. But this is seriously just the beginning. They, as well as related types of quilts (baby clothes, memorial), are becoming increasing popular. This being the case, there are also a growing number of people and companies that will make one for you, or provide you a kit. These quilts are most often not easy to assemble if they are done well. Whether you want to make one or HAVE ONE MADE FOR YOU, read and HEED…

1. KITS. I know it’s fun to do projects and learn new things. This is not something I would recommend for that adventure, unless you are really confident on your sewing machine. If you purchase a kit, be wary that the company sending it to you probably isn’t spending the high dollar for better quality material to send you. You often don’t have much in the way of choices for sashing, border or backing, they simply send you a packet after you pay and you do your best to follow the instructions included. They may not be sending you all the necessary materials to make a quality, lasting product.

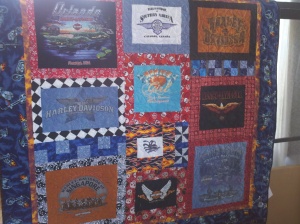
The picture below features a Harley t-shirt quilt I made with each shirt block having a border, rather than using sashing. This works best for t-shirt quilts with similar colored shirts, or repeating themes (i.e. breast cancer walk shirts). But it’s a fun option you don’t have available with a kit.

2. LOW PRICE means you should be suspicious. And no, I don’t say that so people will come to me if I charge more than others. I say it because I have come to find that I generally get what I pay for. I mentioned above that all the necessary materials may not be included; I was referring to stabilizer. It’s a thin iron-on material that keeps the double jersey knit of a tshirt from stretching when you sew it. If that isn’t used, the quilt will quickly become misshapen. If you want it quilted, your quilter will cringe – these tops allow the shirts to shift around and beg for bubbles, folds and lumps in your quilt.

3. LOW PRICE (MORE) can also mean that your t-shirts will all be blocked together like big giant tiles. If the shirts are not very large, the decal or motif from the shirt will not cover much of that square. This could also indicate your quilt maker is only providing you the top, not a completed product. Batting (the center stuff) backing, the labor and materials for binding and quilting the product are all omitted from the price. Be sure you are aware of what the price really means.

4. “I HAVE 16 SHIRTS…”. Ok… I say this because many t-shirt quilt creators charge by the number of shirts. Do they really mean number of panels? Does that mean that no matter the size of the panel or final quilt, it’s about the number of shirts? While I don’t personally agree with this philosophy, it works for many people. Be aware that your t-shirt quilt maker may make assumptions, like that you want the front or back only from each shirt. The queen size quilt pictured here was constructed from 17 shirts (button down, t-shirts, sweatshirt) – I used the front and back panel from each and the sleeve from 2.


Bottom line = if you find the right quilt maker, you will be happy with the result. That person will help you to ask the right questions to ensure they know what you want out of the transaction. T-shirt quilts can be made out of any number of shirts, any size, even with traditional blocks tossed in here or there.

I will be posting instructions on t-shirt quilt assembly in the near future. If you have specific questions feel free to ask! Happy quilting!