TO BORDER OR NOT TO BORDER
There is probably a scientific principle stating how wide the border SHOULD be based on the size of the quilt blocks. But really, borders are a matter of personal preference. If you want to make a quilt larger than the pattern, you add a wider border. If your quilt needs a frame, add a border. In the case of a round robin quilt, almost the entire quilt is composed of borders!
The trend for the past year or so has been to exclude borders, not only with ‘modern’ quilts, but traditional patterns as well. Again, it’s a matter of personal preference, and your needs. I have always believed that a border makes a nice frame – a great stopping point for the eye.
Regardless of the size of border you choose, or the number of borders, or whether they are mitered or applied straight, there are some important tips you need to know to ensure your quilt doesn’t end up a mess.
Let me give you some honest background here: I have made this mistake over and over and over again, and have learned these tricks through a few combined methods. As a quilter, I have seen the product of women who’ve finished their umpteenth Judy Niemeyer class with extensive points and paper piecing to women who brought me their first patchwork quilt, that they learned to make as I did (from a friend, who learned from her mom, no training or classes, and very little actual measuring or precision).
Fortunately that was a long time ago, and I have come a long way. Regardless of your background or the extent of your quilting expertise, EVERYONE is subject to messing up the borders. I’m just fortunate enough to quilt my own messes :), but I promise I won’t share anyone elses! The photos below are from a family project.
THE PROBLEM
Have you ever put your quilt together and had the border look ruffly? Or maybe it came back from the quilter (or if you tied it and bound it) only to find that there is a tuck or two along the outer edge?
These are all symptoms of the same underlying problem: the border is larger than the quilt.
Some ladies at the quilt shop say to measure your quilt in three places (center and along both ends) and to CUT the border to the average length before applying them. I tried that and ended up with a short border. oops.
Some say to pin your border. While I agree that this will help, I believe there is an additional step you can add in to ASSURE your borders do not end up longer than your quilt side.
THE FIX
- Measure your quilt length on the ends and center, average them. Mark this length on the fabric wrong side of your borders (use chalk or pencil, NOT pen), but leave yourself a bit of extra length JUST IN CASE, before cutting.
- Pin your borders onto your quilt top, ensuring the quilt top is on the bottom (very important) and the pins are on the border side on the top. That way you can also double check that your quilt top matches up with the markings from measuring the quilt top that you put on your border.
- Sew the border onto the quilt WITH THE BORDER ON TOP. Why is this step so critical? The feed dogs (the little ridgy things under the walking foot) pull the bottom fabric to the back as the needle goes up and down. There is no offsetting part on top of the fabric that pulls it back, so based on the way a sewing machine is constructed, the bottom fabric will inevitably be moved along at a greater rate than the top fabric.
This same last concept applies when constructing t-shirt quilts – if you are sewing sashing between the t-shirt panels, put the t-shirt side DOWN so that it is pulled through. That way, if it stretches (as it can, even with stabilizer), it won’t be as devastating to your efforts to make a squared quilt.
MITERING CORNERS
A note on mitering your corners… If the outer corner is sewed in too tightly, you get this:

mitered corner, sewn in at improper angle
The quilt above had the selvage edge left on the outside of the border, which made it tighter than the fabric sewn into the quilt side of the border, creating A LOT of puff in the border.
What this meant was that I had A LOT of extra fabric to try to tuck into this quilt. But back to mitering… if you ARE going to do it, ensure you SEW it properly, because ironing it so that it LOOKS correct is not the same thing:

mitered corner that was ironed to look correct rather than being sewn correctly
See how far my finger fits into this seam? There’s that much extra fabric I now need to tack down.
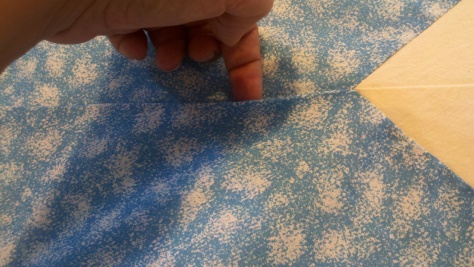
mitered corner excess fabric
How do you prevent this? Again, I learned to sew with very little guidance, and don’t learn well from reading how-to books, so my method is, well, self-taught and not really technical. But it works for me: I sew the two border pieces on up to the 1/4″ seam allowance of the corner. I lay the quilt out top side up and then I fold one border corner under at a 90 degree angle and iron it. I carefully turn it over and pin it so the piece without the crease doesn’t shift from where it lines up with the ironed side. Then I take it back to my machine and sew along the crease. Then I lay it out and see if I got it right. If so, I trim the excess fabric inside the seam, if not I rip it out and fix it in the direction I was off.
Yes, my method is pretty… homegrown, I guess. There are zillions of resources out there if you want to find something more technical or specific on the process. My point in being this honest about my ways is that you don’t have to have a pHd in art, hundreds of dollars of classes and books or years of teaching experience to figure out a way to make it work. Just find a method that works for you.
UNINTENDED CONSEQUENCES
When your border is larger than the quilt top center, there is then excess fabric to get worked into the quilting so that the top still squares up without wrinkles or tucks. The photo below shows the large amount of fabric that needs to be incorporated into the border. This can cause the quilter to have less options on how to quilt the border, or if following the request of the quilt maker, it can cause wrinkles (no bueno).

too much fabric!
In this case it would have cost extra because I had to stitch in the ditch to hold the border down and keep it straight. Then I chose to do a close in meander because that helps to work in extra border without it being so obvious (feathers don’t work it in so well, in my experience).
ROUND ROBINS
Round Robin quilts can result in some amazingly beautiful quilts. But becase they are almost ALL borders, they can also be a quilters’ nightmare. I honestly hate saying that because I do love to quilt them. But it would appear that some people in the groups I’ve quilted the results of are not aware of this issue.
I have literally had to take out 4″ of fabric from one border that STILL ended up too long for the quilt top, but I was able to work the rest in.
The really tricky part of these quilts is that there can be loose ‘borders’ contained by smaller ones, which results in puffy areas within the top. How does that happen? Well, if you sew the border on without pinning and allow too much of the quilt top to pull through on the bottom while sewing the border to it, you CAN end up with a tight border.
My advice to you would be that if you like to be part of a round robin group, talk up front with your group about how they measure and sew their pieces on. That might help avoid uncomfortable or hurt feelings later.
I sure hope you found this helpful. 🙂 Happy quilting!


You must be logged in to post a comment.