Thread Art

Long arm quilting can come with it’s challenges. One of the greatest can be taking a plain piece of fabric and transforming it into this:

TX flag whole cloth mini

TX flag whole cloth mini

That was actually inspired by this:

my inspiration

my inspiration

The whole cloth was a mini quilt I gave to someone leaving the state.

I do love to take pieces of silk and turn them into small art quilts. I have only had the opportunity to make four so far, but for some reason I failed to photograph one of them…

red silk mini whole cloth quilt

red silk mini whole cloth quilt

custom quilting by maria hall

blue silk whole cloth mini quilt

quilting by maria the quilter

feather whole cloth mini quilt

These are great projects to give as gifts or submit for charity auctions.

Lately I have also been playing with mini whole cloth quilts made from patterned traditional cotton.

In this case, I quilted three different pieces in different manners, but each inspired by the fabric itself.

maria the quilter custom quilting

mini art quilt by maria hall

The one above reminds me of pebbles on a beach and the waves rolling around. On a different piece I went completely linear, versus the curves and softness of the one above.

maria the quilter

custom quilting by maria hall

This one just tickles me, but perhaps it’s my odd sense of humor.

quilting by maria hall

the Baptist fan blew my 9 patch away

Here is the back view:

maria the quilter

backside of custom quilt

This piece began with me deciding to thread paint a 9 patch alternating block but as I went along, my blocks were not exactly staying the same size. So I started letting them fade off, meaning, not completing the 9 parts of the block – in some spots there are 5 or 6 or 3 of the 9 expected pieces. So the 9 patch blocks sort of trail off.

Then, using different thread (admittedly not different enough), I quilted this in an all over Baptist fan pattern. Get it? the Baptist fan blew my 9 patch away?!?!? Well, you don’t have to like it, cuz I do. 🙂

In the case below I used thread that was too divergent, with black thread as the background stipple stitch on the black fabric. The result is not bad in person but in photos it looks like amoebas floating amongst squares in a sea of black. See below:

thread art by maria the quilter

thread art by maria hall

Sometimes you just have to play. It doesn’t always turn out magnificent, but I figure if I learn along the way, then I have accomplished something, and as a quilter I have made progress towards being better at my craft.

So quilt on my friends, just don’t forget to have fun. If you aren’t enjoying it, what’s the point? 🙂


swirl play

I haven’t spent time on my long arm machine in probably two weeks. So before I get back into the grind, I need to take time getting back into the groove. Charity quilts are a perfect way to get the kinks out and get myself warmed up.

So today I spent some time on charity quilts, small ones (which is how I could get so many finished). The next customer quilt I’m going to do (I’m 90% sure) will involve swirls, so I decided to practice them.

In the past, I have executed two different swirls – one with points in the center and the other without, which I call cinnamon bun. I saw another one on the internet recently that had a bit of a tiny circle in the center and thought I would try that one too. I call that one swirls with a pearl.

After quilting and trimming each one, I took a photo of the whole top, the top up close and the backside. So here are the trials:

Quilt 1 (swirls with pearls):

swirls with pearls 1

swirls with pearls 1

swirls with pearls up close

swirls with pearls up close 1

swirls with pearls backside

swirls with pearls backside 1

Quilt 2 (swirls with pointed centers):

swirls w points

swirls w points

swirls w points close up

swirls w points close up

swirls w points back

swirls w points back

Quilt 3 (cinnamon buns):

cinnamon buns

cinnamon buns

cinnamon buns close up

cinnamon buns close up

cinnamon buns back

cinnamon buns back

Now that I’ve warmed up, I quilted the swirls with pearls again. So here is quilt 4:

swirls w pearls 2

swirls w pearls 2

swirls w pearls 2 close up

swirls w pearls 2 close up

swirls w pearls 2 back

swirls w pearls 2 back

I did one more of the ‘pearls’ after that and for the most part I liked it. I feel like ALL of them still need some work. Good news is I have a tub full of charity quilts I can work out my kinks with!!!

But the point here is that swirls can mean different things, not just one look. Just like loops can be big or tiny or mixed with flowers or dense or loose or double!

Any quilting pattern can really be morphed just a little bit into something else.

Akin to swirls is thumbprints

thumbprints

or escargot

escargot

Just use your imagination, and who knows what you’ll come up with next! Happy quilting!!

What’s my quilt worth?

That is a loaded question, to be sure. As an appraiser, I hear this question quite often, even outside of doing appraisals. If you are a quilter, you may already know this. Maybe you are not, but someone just gave you a quilt; then PLEASE read below to get perspective on why not to let your dog chew a hole in it, or why it’s so important to NOT let your husband wipe his greasy hands on it after changing the oil in the car (I cringe every time I see an old quilt in the garage).

While there are many groups of very charitable and helpful people out there, I believe that quilters are truly one of the most generous groups of people I know. Most quilters are constantly making quilts, because that’s what they LOVE to do. Yes, some of us sell what we make or make them on commission, but I can tell you I have made and given away at least 5x as many quilts as I have kept for my family (honestly I don’t know what the number is – it could be higher, I never kept track. Because THAT’s not what mattered, I just enjoyed the process). To friends, family, for Christmas, new baby or just because. And everybody I know that quilts does THE SAME THING!

I will say this: most people I see, especially with quilts handed down from generations past, are emotionally attached to their quilts. I like some quilts more than others I have made, that’s just how it is. In the appraisal world, we call this “sentimental value”. And that type of value has zero effect on the price tag.

So, with that out of the way, to help answer the question of value, I’ll break our quilts up into two groups: old/antique and new.

OLD/ANTIQUE QUILTS

Technically an antique is 100 years old or more. So I say ‘old’ here because in the quilting world, quilts from the 1930’s or even up to the 1950’s are often appraised for their insurance value. That is how old quilts are appraised: insurance, or fair market value = how much would they get from the insurance company if they had the quilt appraised and then lost it to fire or whatever.

While I can’t tell you the value of any specific quilt at this time, I can tell you this:

  1. Condition is (almost) EVERYTHING. Just like location in real estate, if the condition of a quilt is poor, it is probably worthless (dollarwise).
  2. The more rare the pattern, the higher the value. In the early 1900’s, these quilt patterns were more popular, which is why you see more of them around, hence the lower value than other, less common patterns: grandmothers flower garden, Dresden plate, trip around the world, four patch and double wedding ring.
  3. The more intricate the fabric/workmanship, the higher the value. In the 1800’s red/green applique was popular. As an example, there are tulip bunch patterns, and as time progresses, the curves in the stems decrease, the stems thicken, the flowers look blockier and the greens change (that’s another topic). Earlier = better workmanship = higher value. Another example is the crazy quilt phase from c1890-1920. Earlier quilts were made from velvet, silks and fine fabrics with LOTS of embroidery and many token pieces. Later, particularly after 1900, this type of quilt was made more utilitarian, with canvas, denim, corduroy and less embellishments. Earlier = better (as long as the silks aren’t so shattered that the condition is bad).

Yes, historic information is great and unusual things like signatures from a church group on quilts CAN lend to value. But these bullets above are most important.

NEW QUILTS

Basically this includes anything current day. And while the values could vary greatly depending on where the fabric was bought, quality of work, tied or quilted, etc., I can give you some hints.

Most new quilts appraise at a much higher value than old quilts. Seems backwards, but for new quilts, the appraisal is done for replacement value. Yes, you would need to replace an antique quilt, but to do so, you would buy one in like and kind, which is why those quilts are appraised for fair market value. New quilts would have to be remade, from scratch.

I don’t think non-quilters have the slightest idea what goes into making a quilt. I say that not with a mean heart, but there are lots of things out there I know diddly-squat about, so when a non-quilter wants me to make them a king size quilt for $100, I have to assume they’re ignorant about my world. It’s not bad, it just is what it is.

Potential costs that contribute to a quilt coming to life (we’re going to assume it’s a large lap size, 60″ x 60″, for illustrative purposes here):

  1. Pattern: depending on how difficult, there may be no pattern required, or pattern and paper pieces for very intricate work, leading up into the $100’s. We’ll say relatively simple: $10.
  2. Fabric: the quilt maker could choose from a variety of quality and types (traditional cotton or batik), and I’ve discovered that where you live makes a significant difference on cost by the yard as well. Looking at your quilt, if the fabric is tightly woven and soft, it’s likely a bit costlier. Let’s assume $10 per yard. For this size quilt with a simple pattern, I estimate 6 yards for the quilt top, 1 yard for border, 4 yards for the backing/binding = $110 (see my point on the king size quilt for $100?).
  3. Thread: don’t need a lot, but at least one spool = $10. I’d actually say $12 but some folks will use a cheaper variety (lintier, maybe not as strong) for $6 or $8.
  4. Batting: this is the stuffing/center/whatever you want to call it. You can buy 100% poly high loft for maybe $5-6/yard, or silk or wool or bamboo for more like $16-18/yard. Cotton and blends are somewhere inbetween. We’ll take poly/cotton blend here, 2 yards at $9 per yard = $18.
  5. Quilting: (this is what I LOVE to do! Although, I do really love to create quilt tops as well…) For an all over design, I charge $0.02 per square inch, so in this case it would be 3600*0.02 = $72. For a fancier or custom design, the price goes up.
  6. Labor: this one gets everyone, and I’ll tell you why. Despite the fact that many people do not know how to sew, they seem to think that people who do know how to sew should be paid a menial wage for it. It’s quite frustrating, really. Anyway, most quilt makers will charge $25/hour and up for their time. Some who specifically dedicate their skills to making quilts for low income families charge less. Some who do fine, intricate hand work charge more. So if you try to conceive how long it took the quilt maker to: choose the fabric, wash the fabric, iron the fabric, cut the fabric to pattern specifications, sew pieces together, iron, sew, iron, trim, sew, iron, trim (seriously, this goes on), piece the backing together, then after quilting, trim the quilt and square it up, cut and prepare the binding, attach the binding to both sides (some do the final side of the binding by hand), THAT’S A WHOLE LOTTA LABOR! For this size quilt, I never charge less than 6 hours JUST for the top assembly (and that’s for the simplest of t shirt quilts). So let’s just round up to 8 hours = $200.

That brings the cost for this hypothetical quilt to $420, not including any other fees or taxes from the quilter or anyone else involved, with some very simplistic assumptions made.

Let that sink in for a moment.

So now imagine you have a queen or a king sized quilt!

Wait, tho… you may be saying. Why can I get a big quilt at Walmart for $100 then? Number of factors: cheaper fabric, cheaper labor, smaller seam allowances (the part tucked inside that you don’t see – most quilters use 1/4″ so that the seams don’t rip open after just a few washes), and finally, mass production.

And for how much time it takes to repair quilts (much of it is hand work), you’re better off investing in a good one in the first place.

So if you have recently (or even not recently) received a quilt as a gift from someone, for a special occasion or just because, PLEASE  P L E A S E thank them for it, because it took them a lot of time and money and they made it because they just loved to make it. And then they thought you were special enough to give it to.

It’s been a while

I haven’t posted to this blog in a while, but I have been blessed this year with a request I spoke late last year, whether I really meant it or not. I prayed that my business would prosper, but that this year I might have time to be creative and do my OWN projects as well.

Actually, I did mean it, because I was SO busy last year I truly did not have time to do anything ANYTHING but quilt for others. Don’t get me wrong = I LOVE quilting work that others bring me! But sometimes, just sometimes, I want to be able to make something. Create something from scratch.

I believe I have been given that very opportunity. Funny enough, I finished up my holiday deadline projects right before we left for Christmas celebration with family in Memphis. I had time to put together a scrap quilt, and then had no business. To clarify, no business due. I did have a few quilts brought to me for the coming year, nothing in a hurry though.

So I quilted a charity quilt for the guild, and finished two O L D projects TO COMPLETION (yay me!), which is unheard of in this house. Then I started another project with scraps.

This week I decided to get all my quilting-for-other-people work done. I have one task I don’t want to do – I have to tell a client I can’t do her quilts. She asked me to follow a pantograph. I don’t do pantographs. I found her someone that could and she said she wanted me to try to freehand a design like it. I tried (on that charity quilt), and it was AWFUL. Which means I not only have a limitation, but I have to admit it to someone else. sigh.

Anyway, the next post you will see from me will be soon, and it will be regarding this last project using scraps. I found a block pattern in a magazine and sort of modified it to make a top, which I finished the center of today. I still need to decide what to do for the border.

But I’m thinking I can take the concept of this block and play with it with different color combinations, different shades and batiks vs. conventional prints. What I’d like to do is showcase this each month, to show how DIFFERENT the same exact pattern can become with very small changes.

I don’t want to spoil all the fun with pictures and everything, but this first time around I took the block and used different colors than suggested and put in sashing and cornerstones. That’s one of my favorite ways to make quilts – it really separates the blocks and relieves the potential for muddled confusion of too much altogether by giving your eyes a break.

So, thanks for hanging with me. I’ll get busy with these pix and write up and plans so we’ve got some good info to circulate. 🙂

Happy quilting!

the not-so-secret stash

It happened yesterday. I thought I was safe, didn’t think it could happen to me. I think I realized it WAS happening to me, so I joked around about it with my friends. But I never actually made any admissions. Never came forth with the truth. I’ve never uttered the words, until today…

My name is Maria and I have a problem. I am a fabricaholic.

I’m a junkie. An addict. And no, I’m not poking fun about addictions. This is real, just as real as any other addiction that a person is consumed with, feels the need to feed and then hide it from others. I’m addicted to fabric.

It’s not shopping, that’s not the problem. It’s that I feel the NEED to OWN every beautiful piece of fabric I come across, knowing full well that someday that will turn into the most amazing finished project. But I have collected so many of these ‘potential projects’ that I can barely find one stacked under all the others. 2 years ago I bought the tiny twister and I STILL can’t find it!

I love fabric. I love the vibrant colors, coordinating patterns, the smell of the dyes, the feel of good quality cotton between my fingers. I love looking at each piece individually and imagining it’s potential, and how beautiful I could make it.

Pause for a deep breath. Ok, better now. Let’s keep going.

I first started to realize that I had this problem when I looked at my expenses and income for last year. The amount of money I spent on fabric was literally insane = I had NO business spending that much on ‘possibilities’. So this year I put myself on fabric hiatus. I told myself no spending on fabric unless it was for a customers quilt, AT LEAST until I had worked my stash down some. That’s when I started really getting busy making some charity quilts.

I ended up so busy with customer and other charity work that I really only finished 2 charity quilts, start to finish so far. I have another one almost done, but obviously 3 small quilts didn’t even make a millimeter dent in my stash.

Let’s make sure we’re all on the same page here… These bins contain, no that’s not the right word. These bins are STUFFED to the brim with fabric in a color similar to the bin itself, to help me stay organized (notice there’s 4 blue bins!). Many of the bottom bins, as well as the cubbies with no bin, hold excessive yardage of fabrics that I was SURE would be used as a beautiful backing someday.

main stash

The bins below are additions I (sigh) had to buy because these bins above were already full. And there are two more behind me, not in the picture. Most of these contain my newest additions = batiks.

secondary stash

And finally, my, um… table.

this is why i can't invite people over

this is why i can’t invite people over

The blue bin tucked under the white and yellow repair quilt is full of quilt tops I’ve made but have yet to quilt. The green bag next to that is full of fabric, as is the small plastic bag next to it. The table holds not only a printer (can you find it?), but fabric, a bag full of strip scraps, a bag of clothing sample squares (for a replica quilt I’ll make someday), the woven basket FULL of vials of beads (my next venture, after I make all these quilts from my stash..), fabric in the box, behind the box, a pillow I made with fabric under it and behind it. And on it.

I was just coming clean with my husband about all this. He called me a hoarder. But at least he said it in a nice way.

Which leads me to this.

I was recently informed that I could participate in the annual garage sale at the local quilt shop. This means I can bring in any quilt or sewing related items to sell. I decided it was time to come clean and stop hoarding.

I measured all my finished quilt tops and I think I have 15. I also have 3 with backing ready. Then it was time to hit the bins.

fabric barf

fabric barf

You can see Fred in the background. I think he was scared.

I started with my bags of fabric sitting over to the side, and then grabbed what I could bin by bin. I measured and cut yardage, 1 yard pieces, 1/2 yard pieces, fat quarters and some ‘charm packs’. I had fabric from the very first quilt I ever made (like 13 years ago?) and some I’d bought 3 years ago and hadn’t seen since. Time for it to go!

I made a lot of progress yesterday going through all this. The blue tub holds quilt tops, yardage, 2 charm packs and a kit and book. The bags on the floor hold the yard and 1/2 yard cuts. On the table are more 1/2 yard cuts and the fat quarters and some squares I cut to make charm packs. In the chair to the left is more fabric I still have to work on. And I still have about 10 bins to go through.

the aftermath

the aftermath

It was nice to touch each piece I had collected. My stash is quite varied, and some of the fabrics looked ugly next to others in the bin where they were stored. Being a fabricaholic, of course NO fabric is really ugly. I was able to see each piece’s potential and beauty again as I caressed it. sigh.

I have a lot of scraps from all this, but most of what I make when I go on retreat is scrap quilts. So that’s not a bad thing – I look at it like I’m getting to keep a little piece of each fabric. Like a memento.

This really is a win-win situation. I either sell a lot and come home with $, or I don’t sell it and I get to bring it back home.

The challenge will be not spending the $ I make from the garage sale to rebuild my stash. Because after all, I didn’t say I was a recovering addict. And I have all these half empty bins now… 🙂

quilting pictures

I have been doing a LOT of work this year. I am incredibly blessed and very lucky to say that my business hasn’t slowed down a bit since Christmas. Couldn’t ask for a better scenario, as a small business owner/self employed artist.

So I thought I would share some photos of work I’ve recently completed. I always enjoy looking at pictures and works others have done, and sometimes find it inspirational. So I hope you enjoy these!

Customers quilt – paisleys all over

paisleys

Quilted for a charity group – the quilt was to be auctioned off to raise funds. This is the top:

top

and the back:

back

This top is one of two identical quilts, only this one was in brights:

whole front

Upon closer inspection, you can see I used a variegated thread in Easter Egg colors, to match the colors in the quilt.

up front

And the back looks pretty cool too!

back

Here’s the sister quilt, in browns and grays:

front

But I quilted it completely different from the other quilt, as you can see from the back:

back

Here is another quilt from the same client. She made two of these, but cut them differently so when the tops were finished, they were different.

top

There were these swirly things in some of the black fabric that looked like thumbprints, so I quilted thumbprints, as you can see on the back quite well:

thumbprints

I wanted to quilt the other top similarly, but couldn’t figure out what to do.

whole front 

 I looked on the internet a bit, doodled a bit, and finally came up with this:

top

This picture really shows it well – it’s called Escargot:

escargot

This quilt was made by her friend,

top 

and I thought she would like a more classic quilting pattern, like feathers. I quilted them within the diagonal lines of the quilt pattern.

feathers

This photo of the back shows the little border and some feathers well:

back

And finally, the Mariner’s Compass. This beautiful quilt was well put together, and she left the quilting entirely up to me.

whole top

She only asked that I fill in the outer purple areas with something that caught the eye, so I made curling purple feathers with variegated thread.

feathers

This photo also shows the feathers, but is also a great example of the outer and inner gold borders. I was SO pleased with how they turned out! It looks a bit metallic, but isn’t – it’s Glide thread.

inner border

This shows that inner border as well:

various

With the lighter spaces, I decided to do heavier quilting, to create that texture. But each round has a different all over design. You can see that above, one having flames and the other a very small meander. See below as well:

top center

Similarly, with the points, I kept the same idea and kept with swirly and rounded themes.

top

points

These quilts were ALL a lot of fun to do. And I greatly appreciate my customers allowing me the freedom to use my creativity with their quilts.

I won’t wait so long before sharing more photos! In the meantime, I hope you’ve enjoyed this little gallery, and perhaps it brought you some inspiration!

Happy quilting!

Lewisville Quilt Guild Raffle Quilt

I wasn’t sure what to title this post, because it’s really about a mix of things. But ultimately it is about THIS quilt, so I decided to keep it simple. But if this still looks like more than you want to read, well, just enjoy the pictures then! 🙂

I wasn’t sure at first that I would bid on quilting this for the guild. I enjoyed doing it last year, and really love to do work that benefits the guild, but to be honest, I really don’t like ’30’s fabric (or ’30’s reproduction)! And this quilt is primarily composed of it.

When I heard at a guild meeting for the second time that they were still looking for bids to quilt it, I went ahead and put one in. And was chosen. Shortly thereafter I received the quilt, but set it aside, as I was working on another quilt that a client wanted to put in the Dallas Quilt Celebration this March.

I decided a few weeks ago that I wanted to have the guild quilt finished by the February meeting (which was last night), so I pulled out the top and draped it over my longarm machine so I could view it from afar and get some ideas. I already knew I wanted to do some feathers in the border and in the white spaces, but I wasn’t sure how they would fit.

The next day I sat again, but with paper, and started drawing. I traced the space I had and drew out what I thought I wanted to do.

first pass, not so good

It looked awful. So I traced the space again and tried a simpler design.

better, but not there yet

Better. Drew it again – got it.

boom - that's it!!

I also figured out that with the large feather in the border that I wanted to do, I would have it oscillate and curl around, and I also didn’t want it to just be contained in the border. There were white blocks from the center that met up with the white border, so I decided to let those areas bleed into each other, rather than having the quilting design stay within the blocks.

So I strung up the back (once I do this, I don’t remove the quilt from my machine until it’s done, so this forces me to GET GOING). I tacked down the edges and decided to start on those edge feathers. I used my Glide thread in white, which really brightened up the white areas.

outer feather begun

After getting a good portion of the outer feather done, I decided I would quilt the center feathers, and just get all the white thread areas completed, and THEN go back through to do the color blocks. This was in part because I wasn’t set on what to do in those areas just yet.

feather partially complete

feather complete

Last year when I did a feather border on the guild quilt, I had just taught myself how to do veined feathers, which I thought were very pretty. The feathers in this year’s border were quite long, so I considered it again, but then thought, 1. I wanted to keep it simple and 2. (more importantly) I didn’t want to vein all the feathers on the inside blocks, so for consistency’s sake, I would keep it simple and classic, and not vein any of the feathers.

all inner feathers completed

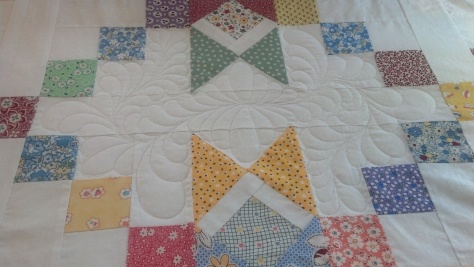
Very happy with my feathered spaces filled in, I finished the border on the bottom and sides and then went back to my initial thought about drawing out some texture in the quilt. I ditched around the chevrons in the color blocks

stitch in the ditch around the white chevron

and did a stipple around the feathers and applique on the outside of the quilt. That really made the feathers and the vine pop out.

stippling

Next up – the colored blocks. My daughter helped me decide to use the lighter of two variegated threads, and I decided just to keep using the white bobbin thread, even though I knew the colors would show through a little on the backside of the quilt. I had drawn up a flower I thought I wanted to put in the star centers, and thought the little flowers in some of the fabric patterns were a good inspiration for the chain blocks. So I quilted little daisy-like flowers in the chain blocks next.

little daisies on a chain

While I quilted the daisies, There were these triangle blocks that I didn’t think I could tie in to the center block flowers. I drew (on paper) leaves that came out from the flower, but didn’t love the way it looked. So I used my magic purple marker (the ink disappears with time and light) and drew right on the blocks to see how a single sided little feather would look in those triangles. I really liked it, so I quilted those in as well.

single sided feathers in triangles

Finally, time for those center blocks. At this point, it was Sunday around noon, and I had a shift coming up at the quilt shop. I decided to quilt one flower like I had drawn,

my drawn flower

to see if I liked it. If not I would have the rest of the day to think on a new design and I could pull out the stitches (ugh) later.

I am glad I gave myself that option, but after looking at the back of the quilt, I was pleased with my flower, so I turned off my machine for the day.

completed flower block

Monday I didn’t have much left to complete – just the flowers, and I thought maybe some of the appliqued leaves, just to provide some more traction around the flowers that were appliqued. I had already filled in the flower centers with little circles to tack them down, but thought it needed a little more.

applique flowers with centers and a ring in the 3rd petal

Once I got to the leaves, I quilted a few and realized that I thought it would look MUCH better to do every leaf. So I did. And then I was done.

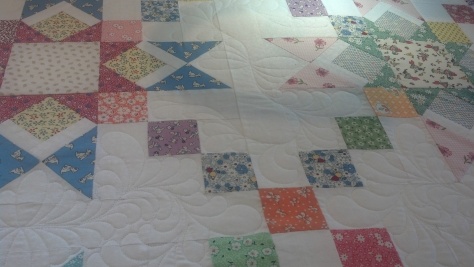
ahhhh. SOOOO happy with the result! These are pictures of the back – you can see the daisy chains, the center feathers, the border feather with stippling and the center block flowers.

backside of quilt

quilt back, a little closer in

backside of quilt, right side

feather border from backside

close in on back

And here are some photos of the front of the quilt:

large section of the quilt front

view of border and part of center

close up view of top

a corner with applique

feather closer in near corner

applique flowers in corner

Now the quilt is in someone else’s hands to be bound and then we’ll get to the tickets, showing at various venues and fundraising. If you have interest in purchasing tickets, please feel free to contact me or the Land O Lakes Quilt Guild for more information!

business planning

I find it sort of funny, when I deal with people in my business (I mean people in the quilting world, in general) only want to know about your quilting history. I am NEVER asked about my former career. I guess it’s funny to me because my “before” and “after” lives are SO dichotomous. Not sure about that word? Look it up :).

At the end of my corporate reign, I was managing a 1.5 million square foot building. To put this in perspective, imagine your bedroom, which might be 15 foot square. 15×15 = 225 square feet. Or your house size = 3-4000 square feet? It was a REALLY big building; actually it was a warehouse, holding home improvement type goods imported from overseas.

If I remember correctly, my budget for the operation was about $43 million. Yes MILLIONS of DOLLARS. Sounds like I’m loony? I don’t remember all the specifics anymore, but I solidly remember that my transportation budget alone was $17 million. We shipped to over 300 stores in 11 states on at least a weekly basis. So to pay for the use of the trailers, the fuel, etc. that was my budget. Add in rent, labor, supplies, utilities and corporate BS and boom – BIG money!

I’m not bragging. I could probably figure out the words to describe how overjoyed I am to be out of that business, but I’m not going to bother. Suffice it to say, to me, now, that is just background.

It is good background tho. I helped a Canadian lady I met on Etsy to build a business plan so she could get a loan for her natural soap company. And now that I have my feet planted on the ground with my business, and have some history tracked down, I am ready to make myself a firm business plan.

I started by making some goals for this year. They were measurable, but not super specific. It is hard to be specific when your business is driven by clients you don’t even know you have yet, and others that call you when they have something for you. There is no guarantees of business, no steady income. But there are expenses driven by workload, and some not…

Not? How do you have to spend money without having a workload? It’s that pesky fabric hoarding addiction thing. My husband and I had a business dinner (beer, queso, the good kind of dinner) to discuss some plans and actions I could take to increase my net income. The first question out of his mouth: Can you decrease expenses? That is the easiest way to increase income without having to increase gross income. Well, if I stop buying fabric… Then he asks the dreaded… “Well how much fabric do you have in inventory?”

I’m not answering that.

Honestly I don’t know. I don’t think I want to know. I’m kind of scared to do that math. So I won’t. Ahhh, the perks of being the business manager.

What I did take from this conversation is that I have a problem, a wound, if you will. And the best course of action for my business is to stop the bleeding. I have plenty of fabric (no I don’t / YES YOU DO / no I don’t / YES YOU DO – this is going on in my head at the moment). I have plenty of fabric and unless I need to buy it to complete a customer’s project, I need to NOT buy it. This truly stopped me from buying this beautiful panel at the store yesterday. It was really hard – I looked at it, and fondled the soft cotton, and then remembered my promise to myself and put it down and walked away.

Step one, day 20 accomplished. Now to just make it through the next 345 days…

This is a pretty significant decision. But truly, I have decided to work on these projects and make quilts for charity – I have a set of 3 quilts on my table in progress and that didn’t even make a 1″ dent in my stack of fabric!

My current charity project

sigh. stack of fabric? it’s actually not a stack, per se. see below…

those bins are all full of fabric

I had to buy more bins because I had so much fabric

Those bins are all full of fabric.

Oh, and then there’s “the table”. It’s actually bags of fabric I brought to a retreat thinking I would get 100 projects done (well, those are the ones under the table), some fabric from mom, 2 repair jobs (yellow and cream pile to the left) and some fabric for those, and some other ‘stuff’, including more fabric (the yellow and blue with duckies is another charity project in the queue). Oh and that blue tub on the left? Full of quilt tops that need to be quilted, most of them with the backs already prepared. HELLO! I could get those done and up on Etsy or given to charity. oi woman! Oh and the basket? Full of beads. So glad I have time for playing with those…

the dreaded table

This is a good thing. I just have to keep repeating that to myself. I have enough. Ya, enough to make quilts for the next 10 years. So as a prudent business owner, I need to use my planning skills and business smarts to know that I am not allowed to buy fabric just because I want to.

That was the biggest realization. Next I’m going to tackle a specific budget. I.e. at the end of each month, I will put the sales tax $ into another account. I will also figure out what % I think I should pay myself and what % to put into my expense account, for purchase of REQUIRED supplies.

I think this is a pretty strong start. Now – on to some quilting!

charity work thursday

i decided that the best way to attack my very important decision to do charity work weekly, was to actually assign a day to do it. i wasn’t sure this week if that would be thursday or friday, but thought the best plan would be thursday in case friday got crazy busy. i was thinking going forward that planning on thursday’s would be my best bet.

last week when i looked at some of my favorite fabric, i decided on the size of the main panel, and cut three, as well as figuring the inner and middle border sizes i wanted to have for the quilts.

today i scouted out the bricks for the middle border, some from my scrap pile and some from my fabric bins, as well as choosing and cutting my inner border. so i cut my border bricks into strips and am now ready to assemble them into the border bricks.

this is what the quilts will look like when finished (for the most part. they will be larger than this, square rather than rectangular).

noahs ark ez breezy

this one above i had quilted with baptist fans, so it looks like rainbows, which i think really is appropriate either way.

i feel so blessed to have the ability to make quilts like this, to do charity work like this. and THAT is why i feel it is SO important to give back to my community.

i didn’t get a charity quilt completed today, but that’s not what i promised myself i would do, so i’m not upset. i’m actually working on 3 at once, so i know it will take some time to get them all done. i did submit significant throught and time to these quilts, so i know i’ve made progress.

and that’s what counts.

week 1 goal met – charity work done!

I love to do charity work, especially when it involves quilting. I get such a warm and fuzzy feeling inside when I do something that I know will help someone in need. I know a LOT of other quilters that are very generous with their charity work as well, so I feel right at home in this profession.

One of my favorite ‘charity’ groups to donate my time to is Quilts Of Valor Foundation (http://www.qovf.org/). As a veteran, I understand how lucky I am to not have trod the sand, slept in desert heat, fired my rifle at anyone or come home missing body parts. So if I can do one thing that I love to do, AND help out someone that gave their time and well-being to protect ME and my fellow citizens, well then, I want to do that!

The process is pretty cool actually. Someone, or a group of people (I’ve had quilts come from a quilting bee) make a quilt top and use the website to have it directed to a longarm quilter, like me. They send the quilt back and top to me, and I add the batting and quilt it, in whatever style and color I want to use.

Many of the quilts are patriotically themed. Lots of red, white and blue quilts, quilts with stars, or military panels. Sometimes the quilts are just completely different, which is nice too. 

The quilt I finished today was one of those – it does have a pattern of opposing light and dark stars, but the darker fabrics are scrappy and very small, which makes for a beautiful, classic look.

QOV scrappy stars

With this pattern, I wanted to use my variegated blue/white thread and quilt swirls over the stars. Doing a rounded quilting pattern on a quilt top pattern that has more angles can create a unique visual effect. Well, I like it anyway. Hopefully the recipient will also.

swirls on stars

From there usually one of two things happens.

Sometimes I trim and bind the quilt, then wash it per the instructions of QOVF and send it on to wherever they tell me to. One I’ve sent off to Germany, one to Los Angeles and I think one to MD.

Most of the time the quilt maker wants me to send it back to them and they take care of that aspect and have it shipped to the final destination. Along with the quilt I send pictures of my studio and a short letter telling them about me and my family and the process that creates their quilt.

The quilts all go to veterans of war. They all go to someone deserving.

The trouble is that there is ALWAYS a greater need than there is supply. I have received quilts from both coasts because there is a shortage of longarm quilters that participate.

quilt on the longarm

Usually I am sent about one per month. Per my 2013 goals, I have completed my charity for the first week! And it felt really good. 🙂