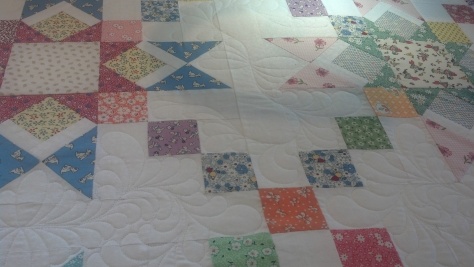
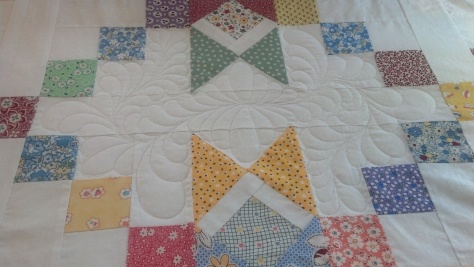
I wasn’t sure what to title this post, because it’s really about a mix of things. But ultimately it is about THIS quilt, so I decided to keep it simple. But if this still looks like more than you want to read, well, just enjoy the pictures then! 🙂
I wasn’t sure at first that I would bid on quilting this for the guild. I enjoyed doing it last year, and really love to do work that benefits the guild, but to be honest, I really don’t like ’30’s fabric (or ’30’s reproduction)! And this quilt is primarily composed of it.
When I heard at a guild meeting for the second time that they were still looking for bids to quilt it, I went ahead and put one in. And was chosen. Shortly thereafter I received the quilt, but set it aside, as I was working on another quilt that a client wanted to put in the Dallas Quilt Celebration this March.
I decided a few weeks ago that I wanted to have the guild quilt finished by the February meeting (which was last night), so I pulled out the top and draped it over my longarm machine so I could view it from afar and get some ideas. I already knew I wanted to do some feathers in the border and in the white spaces, but I wasn’t sure how they would fit.
The next day I sat again, but with paper, and started drawing. I traced the space I had and drew out what I thought I wanted to do.
It looked awful. So I traced the space again and tried a simpler design.
Better. Drew it again – got it.
I also figured out that with the large feather in the border that I wanted to do, I would have it oscillate and curl around, and I also didn’t want it to just be contained in the border. There were white blocks from the center that met up with the white border, so I decided to let those areas bleed into each other, rather than having the quilting design stay within the blocks.
So I strung up the back (once I do this, I don’t remove the quilt from my machine until it’s done, so this forces me to GET GOING). I tacked down the edges and decided to start on those edge feathers. I used my Glide thread in white, which really brightened up the white areas.
After getting a good portion of the outer feather done, I decided I would quilt the center feathers, and just get all the white thread areas completed, and THEN go back through to do the color blocks. This was in part because I wasn’t set on what to do in those areas just yet.
Last year when I did a feather border on the guild quilt, I had just taught myself how to do veined feathers, which I thought were very pretty. The feathers in this year’s border were quite long, so I considered it again, but then thought, 1. I wanted to keep it simple and 2. (more importantly) I didn’t want to vein all the feathers on the inside blocks, so for consistency’s sake, I would keep it simple and classic, and not vein any of the feathers.
Very happy with my feathered spaces filled in, I finished the border on the bottom and sides and then went back to my initial thought about drawing out some texture in the quilt. I ditched around the chevrons in the color blocks
and did a stipple around the feathers and applique on the outside of the quilt. That really made the feathers and the vine pop out.
Next up – the colored blocks. My daughter helped me decide to use the lighter of two variegated threads, and I decided just to keep using the white bobbin thread, even though I knew the colors would show through a little on the backside of the quilt. I had drawn up a flower I thought I wanted to put in the star centers, and thought the little flowers in some of the fabric patterns were a good inspiration for the chain blocks. So I quilted little daisy-like flowers in the chain blocks next.
While I quilted the daisies, There were these triangle blocks that I didn’t think I could tie in to the center block flowers. I drew (on paper) leaves that came out from the flower, but didn’t love the way it looked. So I used my magic purple marker (the ink disappears with time and light) and drew right on the blocks to see how a single sided little feather would look in those triangles. I really liked it, so I quilted those in as well.
Finally, time for those center blocks. At this point, it was Sunday around noon, and I had a shift coming up at the quilt shop. I decided to quilt one flower like I had drawn,
to see if I liked it. If not I would have the rest of the day to think on a new design and I could pull out the stitches (ugh) later.
I am glad I gave myself that option, but after looking at the back of the quilt, I was pleased with my flower, so I turned off my machine for the day.
Monday I didn’t have much left to complete – just the flowers, and I thought maybe some of the appliqued leaves, just to provide some more traction around the flowers that were appliqued. I had already filled in the flower centers with little circles to tack them down, but thought it needed a little more.
Once I got to the leaves, I quilted a few and realized that I thought it would look MUCH better to do every leaf. So I did. And then I was done.
ahhhh. SOOOO happy with the result! These are pictures of the back – you can see the daisy chains, the center feathers, the border feather with stippling and the center block flowers.
And here are some photos of the front of the quilt:
Now the quilt is in someone else’s hands to be bound and then we’ll get to the tickets, showing at various venues and fundraising. If you have interest in purchasing tickets, please feel free to contact me or the Land O Lakes Quilt Guild for more information!


You must be logged in to post a comment.